 |
Shop front -
Full index -
Search in puzzles -
FAQ -
Contact us
-
日本語
"The room behind the shop" (editorial) - Puzzle manufacturers: Apollo - Appleone - Beverly - Cuties - Epoch - Ensky (Artbox) - Road - Tenyo - Yanoman - more history |
Golden Week holidays
We are now in the April-May holidays: this means that the only days this week that the Post Office is operating are Tuesday 30 April to Thursday 2 May. Normal operation starts again on Tuesday 7 May.
"Not the shop!" (Editorial)
Jigsaw puzzle murals

Sometime late in 2003, it came to my attention that the two walls of the stairway of our house, which we had painted in a nice contrasting dark grey-blue, to set off the humdrum ivory of the other walls, had faded horribly. Somehow or other, a few neurons collaborated, and an Idea was born! I'd display a completed puzzle or two on the wall, and I would save the expense involved in buying a frame. In any case, I wanted to try gluing a puzzle some time, since I had never done it, and felt a bit guilty giving other people instructions on what to do with the glue and the mystery object*.
* The mystery object... see the details of Yanoman puzzle contents. Number 6 is the "mystery object", which further down you'll notice I've mentioned again: spread [the glue] out carefully with the mystery object. And still people keep writing to tell me what the mystery object is. (Confession: at some stage, I inadvertently edited the description so that it said sponge instead of mystery object. I've corrected it back, and you are all forgiven.)
I had in fact tried gluing a puzzle using the supplied glue, and the method described in the instructions. I found it not easy to get a good result: it's the sort of operation you have to do in one go, and it doesn't seem to be easy to patch up defects later on. So I decided to use an entirely different method. Basically, I turned the puzzle over, applied glue, and stuck on a backing sheet of heavy kraft art paper.
This isn't trivial, either! Here's the first mistake I made (actually while trying it out with the first puzzle that I had already glued from the front): I put the puzzle face down on some newspaper, on the table. Then I applied spray glue (the sort paper layout artists use) all over the back. Then I carefully applied the sheet of backing paper. Unfortunately, I forgot that during this process the puzzle would move on the table, and the spray glue that had just missed the puzzle was on the newspaper that the front of the puzzle had just slid onto. Urgh! So here's the revised and successful procedure...
- Take a large sheet of cardboard, bigger than the completed puzzle, and preferably the same thickness. (I use our corrugated paper packing material.) Place it on a (cuttable) working surface, and place the puzzle on top (face down, but doesn't matter).
- Cut around the puzzle with a modelling knife. This makes a frame that neatly fits around the puzzle. (You don't need the bit cut out of the middle, unless you can use it to do a smaller puzzle.)
- Clear the space, and cover anything that matters with newspaper. Place the puzzle face down, and place the frame you made in step 2 around it. It might help to use about four tiny pieces of adhesive tape to make sure the frame and puzzle don't move out of alignment.
- Spray the back of the puzzle with glue. Any that misses the puzzle will land on the cardboard 'frame'.
- Carefully apply the sheet of stiff backing paper to the back of the puzzle. Smooth it all out.
- Cut the backing paper carefully around the puzzle.
This gives you a glued-together version of the puzzle, leaving the front surface in its original condition. It is now relatively easy to glue the puzzle to the wall (or to any other backing, of course). And if it does come off the wall for any reason, it will do so in one piece, so you can mount it somewhere else.
But first, of course, you paint the wall, appropriately!

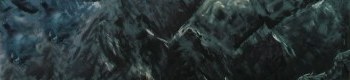
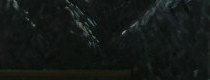
A trompe l'oeuil seemed the obvious ploy - to give a completely new outlook from our house. Or indeed, how better to hang a painting on the wall than by painting on the wall. I finished the castle wall in late 2003, and for a while we looked out into the courtyard of Hōnen-in, but unfortunately that puzzle was overcome by the extremes of humidity we are prone to here in the summer, and detached itself from the wall while I was in England (2004). So on my return in September, first I painted the opposite wall, then finished off with two new puzzles.
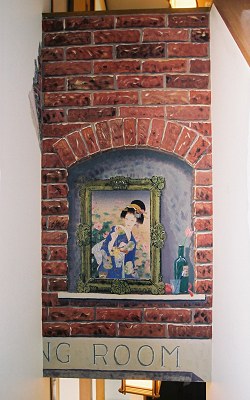
The "framed" painting is Sparkler, one of Haruyo's beauties, but long discontinued. I had just been visiting one or two old houses in England, where the favourite pastime is stripping off old plaster from the walls, and I painted what I imagined this might reveal - brickwork, old plaster, a curious engraved lintel...
Oh, yes. I made the lampshades as well, a decade or three ago.
